Display the Histogram palette (‘Windows -> Histogram’
Open the levels or curves palette (‘Image -> Adjustments ->Levels . . .’ and adjust the tonal range of the entire image, then close the palette
Select the rectangular Marquee tool – set the feather value to 0, and the style to ‘Normal’.
a) Select a small rectangular portion of the image and observe the histogram.
b) Select a different area of the image and observe the histogram.
c) Click within the selected area and drag it to a new location.
d) What is the histogram doing ? It is changing the levels of tonal range where the image is selected.
e) Open the levels or curves palette and make a change. What happens ?
tonal range begining to degrade as the histogram is more fragmented as the original tonal range is stretched across the histogram.
f) Use the selection types buttons to add to and remove areas from the selection .
g) Use the Shift and Alt keys to add to and remove areas from the selection.
h) Press +D or click once in the image to discard the selection.
i) Use the History palette to undo all the changes you have made.
j) Set the style to fixed ratio, enter a value for width and height (eg 2 and 3), then select an area of the image.
k) Set the style to fixed size, enter a value for width and height (eg 200 and 100), then select an area of the image
l) Set the feather value to 25, select an area of the image and make a tonal or colour change to the image. What do you observe ?
The selected area can be altered and by using the 'feather' tool it allows for a soft fade out of the alteration around the edges of the selecion.
m) Press +D or click once in the image to discard the selection.
n) Use the History palette to undo all the changes you have made.
6) Select the circular Marquee tool – set the feather value to 0, and the style to ‘Normal’.
a) Select a small portion of the image.
b) Press +D or click once in the image to discard the selection.
c) Press and hold the shift key while you select a portion of the image. What happens ? The circular marquee tool can be altered in size without distorting the shape.
d) Press and hold the shift key while you select another portion of the image. What happens ? A second circular marquee is created, and when overlapped join together to create one single selection.
7) Select the Lassoo tool.
a) Select a small portion of the image.
b) Add and subtract areas to the selection and use the feather option.
c) Discard the selection
8) Select the Polygonal Lassoo tool.
a) Select part of the image by clicking a start point and adding modes until you click on the start point to finalise the selection.
b) Start a new selection and use the Esc key to abort the selection before you finalise it.
c) Start a new selection, add some nodes and then use the Delete key to backstep through the nodes you have added.
d) Set the feather value to 2.
e) Select the two areas of the timber wall.
f) Use the Hue control to change the colour of the wall.
g) Go to ‘Select->Save Selection . . .’ and save the selection as Walls.
h) Discard the selection.
9) Select the Magnetic Lassoo tool.
a) Select the grey metal roof by clicking a start point and adding nodes until you return to the start point to finalise the selection. Use the Esc key to abort, and the Delete key to remove unwanted nodes if you need to. Click on any point to force a node to be created. You may need to use the other selection tools to tidy up edges etc to make an accurate selection.
b) Save the selection as Roof.
10) Select the Magic Wand tool.
a) Set the tolerance to 32
b) Click in the sky to select part of the sky.
c) Hold down the shift key and click to add all the sky and clouds into the selection. Use +Z to undo the last addition if required.
d) Save the selection as Sky
11) Use whichever tools you want to make and save a selection for the bricks. 12) Select ‘Select->Load Selection . . .’ and set Operation to ‘New Selection’ to reload the selection of the sky.
a) Use ‘Select->Inverse’ to invert the selection ie the entire building will be selected instead of the sky.
b) Save this selection as ‘Building’
13) Choose ‘Select->Color Range . . .’
a) Click on the blue part of the sky and use the Fuzziness slider to select all the blue sky.
b) Use the Burn tool to darken just the lower part of the blue sky without affecting the building or the white clouds.
c) You can use +H to hide the selection outline while you do this. Use +H to reveal the selection outline when you have finished.
Tuesday, June 1, 2010
Exercise 6 - Basic Image Corrections
Display the Rulers. What is the keyboard shortcut ? Ctrl R
Display the Grid. What is the keyboard shortcut ? Ctrl '
Use the Measure tool to draw a line down the centre of the façade following the joins in the bricks. Record the following:
a) How long is the line in pixels and in cm ? 6cm, 708px
b) What is the angle of the line ? 92.6
Open the Curves palette and adjust so the image has a full tonal range and good overall brightness (Gamma correction).
What has happened to the histogram ? The avaliable tonal range has been spread to reach both ends of the spectrum. By stretching the tonal range of the image it creates gaps ('comb' effect) along the histogram because of the limited tonal range of the original image.
What is the difference between changing the image size vs. changing the canvas size ?
changing the 'image size', resizes the image (changing the pixels ect). When changing the 'canvas size' the image quality remains the samehowever the size of the image is cropped to whatever size is requested.
Use the Clone stamp tool to remove a window from the façade of the building.Turn ON the ‘Align’ option, set a soft brush with a diameter of 20pixels, and ‘Alt + click’ in the brickwork to set the point to start copying from.
a) How does the behaviour change when the ‘Align’ option is turned off ?
When the align option is turned ON you can reproduce the sample image area. when it's OFF you can only repeat the area in which you have sampled.
Monday, May 31, 2010
Exercise 5 – File Types & Sizes
1. Width of the image in pixels:2500 Pixels
2. Height of the image in pixels:2000 Pixels
3. Calculate the size of the image in Megapixels:5 Megapixels
4. What is the specified resolution of the image:30 Pixels/Inch
5. Width of the image in cm:21.17 cm
6. Height of the image in cm:16.93 cm
Select ‘File -> Save As…’ and save the image in the following formats. Name the files to clearly identify them.
After each save close the image and reopen to save to the next format. Use the Finder/File Browser to record the sizes of the files created.
1) The original .tif file:15.2 MB
2) TIF file using LZW compression:10.6 MB
3) Photoshop .psd file:15 MB
4) Jpeg file – Quality level 12:4.2 MB
5) Jpeg file – Quality level 10:1.9 MB
6) Jpeg file – Quality level 5:721 KB
7) Jpeg file – Quality level 1:442 KB
8) GIF file – 256 colours – no dithering:2.9 MB
9) GIF file – 256 colours – diffusion dither:3.5 MB
10) GIF file – 16 colours – diffusion dither:1.5 MB
Exercise 4 – Bit Depth and Colour Modes
How big is an A4 page in cm ?21cm x 29.7cm
Open the file ‘Img 1 – Ex 4 - Granger-Rainbow.tif’ in Photoshop :-
Select ‘Image -> Image Size …’ and ‘Image -> Mode’ and answer the following questions :–
Image size in cm: 29.63cm x 20.32 cm
Pixel Dimension: 3500 x 2400
Image size in megapixels: 8.4
Resolution of the image(ppi): 300 ppi
Image size in megabytes: 24M
Colour Mode: RGB
Bit depth: 8bpc – 24 bits
Hint: Use the Status line to display the image size – use the number on the left.
Use the ‘Image -> Mode’ menu to select the following modes / bit depths and fill in the table for each case listed.
Colour Mode
RGB
RGB
CMYK
Greyscale
Indexed Colour – 256 colours
Bitmap
Bit Depth per channel
8
16
8
8
N/A
1
Total Bit depth
24
48
32
8
N/A
1
No. of available colours
256
2.8x10^14
4.3 billion
256
-
2
Image Size (Mb)
24
48
32
8
-
1
Exercise 3 – Photoshop CS4 Interface
Identify the following items on the diagram below :-
Menu Bar,Tool Bar,Options Bar,Palettes/Panels,Image Title Bar,Status Bar,Button Bar
Menu Bar: along the very top of screen
Tool Bar: down the left hand side of the screen
Options Bar: under the Menu bar
Palettes/Panels:down the right-hand side of the screen
Image Title Bar: under the 'Options Bar'
Status Bar:along the bottom of the screen
Button Bar:
Start Photoshop CS4. Describe three ways of starting Photoshop :
1) Clicking the Adobe Photoshop desktop icon
2) Dragging image onto photoshop icon
3) Right Click on an image'open with: photoshop'
Open ‘Photoshop->Preferences->General …’. Turn off the option ‘Zoom Resizes Window’. Click ‘OK’ to save the change.
What are the shortcut keys for the following tools :
Hand tool: H
Move tool: V
Crop tool: C
Text tool: T
Zoom tool: Z
Open the image file ‘Img 1 – Ex 3 - Image-1.jpg’ and do the following :
a) What is the colour mode of the image, and what is the bit depth of the image ? (Identify two locations where this information can be found). Its RGB 8 bit image,info displayed on 'Image Title Bar' or through the Menu bar 'Image > Mode'
b) What is the zoom percentage that the image is displayed at ? 16.67%
c) Change the zoom percentage to 28%.
d) Click on the green button on the title bar. What happens ? This changes the display size of the image
e) Fit the image to the screen. What is the zoom percentage ? 19.99%and what is the keyboard shortcut ? Ctrl 0 (zero)
f) Zoom to 100%. What is the keyboard shortcut for this ? Ctrl Alt 0 (zero)
g) What does 100% zoom mean ? your are viewing the actual size of the image on screen
h) What do the ‘ + ‘ and ‘ - ‘ keys do ? The '+' key zooms in the '-' key zooms out
Using the 'Status Bar'
1) What is the image size in pixels and the image resolution in dpi ? 2020 by 2906pixels with 300dpi
2) What is the document size in Mb ? 16.8megabytes
3) What do the two sizes refer to ? The number on the left refers to the prining size of the image. The number on the right refers to the file's size
Press the ‘Tab’ key. What happens ? Press the “tab’ key again. allows you to turn on/off all of the toolbars/palettes and panels
What is the keyboard shortcut to close a document window ? Ctrl W
What is the keyboard shortcut for quitting Photoshop? Ctrl Q

Exercise 2 – Image Basics
1. Width of the image in pixels 2000
2. Height of the image in pixels 1500
3. Calculate the size of the image in Megapixels 3
4. What is the specified resolution of the image 300
5. Width of the image in cm 16.93
6. Height of the image in cm 12.7
Turn OFF the ‘Resample Image’ option and change the Resolution to 150 pixels/inch.
7. Width of the image in pixels 2000
8. Height of the image in pixels 1500
9. What is the new Width in cm 33.87
10. What is the new Height in cm 25.4
11. What is the image size in Megapixels 3
Change the resolution back to 300 pixels/inch
Turn ON the ‘Resample Image’ option and change the Resolution to 150 pixels/inch.
12. Width of the image in pixels 1000
13. Height of the image in pixels 750
14. What is the new Width in cm 16.93
15. What is the new Height in cm 12.7
16. What is the image size in Megapixels 0.8

Friday, May 28, 2010
Week 4
Colour wheel
R-Y G-C B-M
You can describe amount of any colour in an image by increasing amount of its opposite on the colour wheel-vice versa.
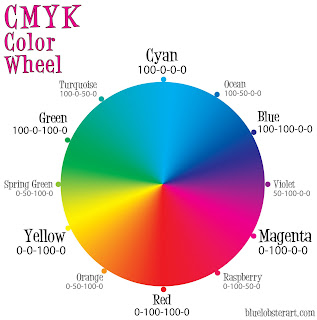
In a CMYK image, you can decrease amount of colour by increasing its complement which is green the colour opposite it. In an RGB image, decrease magenta by removing red and blue or by adding green.
RGB, CMYK or greyscale.
Hue= colour reflected or transmitted, 0` and 360`
Saturation= strength or purity of colour (chroma). How much grey in proportion to Hue. O% to 100% fully saturated.
Brightness= lightness or darkness of colour, measured as a % from 0% (black) to 100% (white)
Major colour modes
Bitmap mode, indexed, greyscale mode, lab, rgb, cmyk, duotone, multi channel.
Bitmap= uses one of two colour values (b or w) to represent pixels in an image. 1 bit depth.
Greyscale= different shadowing of grey. Every pixel of greyscale has a brightness value ranging from 0 (black) to 255 (white).
16 and 32 bit images, number of shades is much greater. Can be measured as %. 0% = white, 100%= black
RGB= assigns intensity value to each pixel. Intensity value to each pixel. Intensity values range from 0 to 255 for each of the RGB components.
http://bluelobsterart.com/wordpress/wp-content/uploads/2009/03/cmyk-color-wheel-lg.jpg
Week 3
TIFF- tag image file format- developed by Aldus Corporation in 1986, saving images from scanners, frame grabbers, paint/photo retouching programs
Today- most versatile, reliable and widely supported bit-mapped format/ it is capable of describing bi-level, greyscale, palette-colour, full-colour image data in several colour spaces.
PICT file= this format-not an acronym- native to macitosh. It first appeared in 1984 with introduction of MacDraw software, great for presentations, screen displays and video work.
Can contain bit-mapped and object-oriented graphics
BMH file= standard windows bitmap image format on DOS and windows-compatible computers. When saving an image in this format, you can specify either Microsoft windows or OS/2 format.
EPS file= encapsulated postscript- files are the standard format for storing high resolution postscript illustrations. EPS format- introduced in mid 1980’s allows both mac and windows users to save bit-mapped screen representations of screen images.
GIF file- graphics interchange format- files define a protocol intended for the on-line transmission and interchange of raster graphic data in a way that is dependent of the hardware used in their creation or display
Developed in 1987 by compuserve- one of the worlds most successful bulletin borad services- for compressing 8 bit images that could be telecommunicated through their services and exchanged among users.
JPEG file= standard image compression mechanism. Name derived from the Joint Photographic Experts Group, the original name of the committee that wrote the standard. Not a file format, but a method of data encoding used to produce the size of a data file commonly used within file formats such as JTIF & TIFF.
(JFIF)JPEG file interchange format, minimal file, enables JPEG bit streams to be exchanged between a wide variety of platforms and applications
Jpeg designed for compressing either full-colour or greyscale images of natural, real world scenes. It discards data- referred to as lossy
JPEG2000- wavelet based image compression standard. Created in 2000 by joint photographic experts group committee.
PNG file- developed as an alternative to GIF- used for the net like GIF. It preserves all colour info and alpha channels in an image and used lossless compression to reduce size.
PDF adobe acrobat electronic publishing software for Mac, windows, Unix and DOS.
PSD- Photoshop files- a file saved in this can only be opened and edited in Photoshop. User has option to save the file in a variety of other formats.
Visible portion of the electromagnetic spectrum extends from about 400nm (violet green) to about 700nm (red light) with our eyes having peak sensitive at about 550nm (green light)
Additive colours.
Primary colours- red, green, blue
Subtractive primaries are pigments which create a spectrum of colours in different combinations. Unlike monitors, printers use subtractive primaries to produce colour. Cyan, magenta, yellow, black= cmyk.
Thursday, May 27, 2010
Week 2
Bit= binary digit. It’s the smallest unit of a binary number having a value of 0 or 1.
Binary number= number system used by computers only. Digits 0 and 1 are used to represent values
But depth= number of bits used to define the shades of colour in an image or in each channel of an image
Higher bit depth= more shades or colours
1 bit= 2 values
8 bit= 256 values
Binary arithmetic= addition and multiplication can be performed on binary numbers just as decimal numbers are.
Byte= a group of 8 bits- this represents 256 values
Word= number of bits that the computers processor can manipulate or process in one operation
Kilobyte= 1024 bytes
Megabyte= 1,048,576 bytes
Gigabyte= 1024 megabytes= 1,073,741,824 bytes
Terabyte, petabyte= even larger
Server= a computer that provides services to other computers that all connect to it eg: file servers, print, net.
Vector= a combination of a direction and a value.
Vector image= combined lines and shapes defined mathematically. Viewed or printed at any size with no loss of sharpness.
Raster image=composed of many individual dots or “pixels” arranged in a grid pattern to display any image on a screen it must be converted to a raster image by the computer
Pixel= picture element- the smallest component of a raster image. Each pixel has a value representing a colour or a tone.
Image size= how big the image is, eg: number of pixels, size of file, inches, cm or page size.
Pixel dimensions= number of pixels or dots per inch or cm.
File type/ format= Tiff- tif, tiff, jpeg, jpg, JPEG
Eg: TIFF or PSD can save different types of images
Friday, April 9, 2010
Week 1
workflow= start> goal
- meet customers
- requirements
- photographs
- contract or agreement
digital
- CD
- slideshow
- USB
- Email
albums/hard copy
- framed pictures
time
- efficiency
- location
- weather
- resources
-computer
-software
discuss requirements
capture images
- DSLR, film
- movies
- still from video
- scanning
- photo library, stock images, internet
upload images
- computer
work on images
- editing
- sorting and selecting
bulletproof
- backup photos
- hard drive
advanced editing stage
- flattening image, resizing ect.
finalising image
- prepaing file for output or delivery
- archiving steps
- meet customers
- requirements
- photographs
- contract or agreement
digital
- CD
- slideshow
- USB
albums/hard copy
- framed pictures
time
- efficiency
- location
- weather
- resources
-computer
-software
discuss requirements
capture images
- DSLR, film
- movies
- still from video
- scanning
- photo library, stock images, internet
upload images
- computer
work on images
- editing
- sorting and selecting
bulletproof
- backup photos
- hard drive
advanced editing stage
- flattening image, resizing ect.
finalising image
- prepaing file for output or delivery
- archiving steps
Sunday, March 7, 2010
Excercise1- Image Uses
End uses of imagery:
Sporting events, travel, fashion, street, documentary ,news, fine arts, nature, portrait, weddings, architecture, model, runway, property, forensic, cityscapes, landscapes, waterscapes, gardens, industrial, flowers and plants, cars , food ,public events, advertising , domestic animals and wildlife.
Sports photography:
Potential employers/clients:
Sporting magazines, newspapers, advertising agencies, clothing companies, sponsors.
Display: magazines, billboards, newspapers, internet.
Size and quality: magazines- A4 page with very high quality, billboards- up to 3m by 5m with medium to high quality, newspapers- up to a full page with low quality, internet- screen size with medium to high quality.
Fashion photography:
Potential employers/clients: fashion magazines, fashion designers, clothing companies, hair and makeup stylist and advertising agencies.
Display: magazines, newspapers, billboards
Size and quality: magazines- A4 page with very high quality, newspapers- up to a full page with low quality, billboards- up to 3m by 5m with medium to high quality
Travel photography:
Potential employers/clients:
Travel magazines, advertising agencies,
Display: internet, brochures, magazines
Size and quality: internet- screen size with medium to high quality, brochures- 10cm to 15cm with high quality, magazines- A4 page with very high quality
Subscribe to:
Comments (Atom)
